
Author: Salvatore Interlandi, Interim Chair, Cinematography Department, New York Film Academy
A covered wagon is a homemade soft light that is basically light sockets mounted to a strip of wood wrapped in chicken wire to create a structure that will support diffusion around the fixture. Perfect for night interiors and a must on my truck.
Jay Holben details the creation of a diffused batten strip using readily available materials in this great book on homemade lights: A Shot in the Dark: A Creative DIY Guide to Digital Video Lighting on (Almost) No Budget by Jay Holben.
Materials:
- A strip of batten
- Pigeon plate
- Chicken wire
- Electrical tape
- Duct tape
- One 25′ #12/3 cable
- Wire nuts
- Box of short (1/2″ or 5/8″) wood screws
- Surge protector
- Dimmer – Leviton 600 watt rotary dimmer
- Binder clips
- Four porcelain sockets
- Four bulbs of your choice: (PH 212, PH 211, BCA, BBA, or CFL’s)
Diffusion: Unbleached muslin (diffusion of choice), 250, opal, or parchment paper (if you are on a budget.)
Commando Cloth (Duvatyne can work, but commando cloth is stronger, better, and safer.)
Tools:
- Staple gun
- Drill
- Wire crimpers
- Wire cutters
- Screwdriver
- Pliers
Disclaimer: Anyone attempting to make homemade lights must have a clear & strong understanding of electrical wiring and electricity. If you do not have a strong understanding of electrical wiring, then it is advisable to NOT build any homemade lights.
Step One:
Take your batten strip (suggested size for a 4 bank wagon – 1′ x 4′ x 5′), space out your porcelain sockets, and attach them to the batten. You can design any size covered wagon you want – 3 bank, 5 bank, 6 bank.
Step Two:
Lop off the Female Edison Connector and strip off about five feet from the #12/3 extension cord. You will use the male prong to plug into your variac or surge protector that will act as your on/off switch.
Step Three:
Wire the porcelain sockets together in a parallel circuit to either the dimmer or to the bare ends of the extension cable. You can use the wire that you lopped off the #12/3 extension cord as conductors. Be sure to keep consistent black wire as your hot and white as your neutral. Be sure to use wire nuts and electrical tape to secure the connection. If you are using a rotary dimmer, then be sure to attach the dimmers to the batten strip as well as wiring up the dimmer(s) to the bare ends of the extension cord.
NOTE: Before making homemade lights you must have a clear understanding of electrical wiring and how electricity works. A great resource for you would be to look at the chapters on electricity in the Set Technician’s Handbook written by Harry C. Box before taking on this endeavor.
Step Four:
Center and secure the pigeon plate to the back of the batten strip for quick and easy mounting.
Step Five:
Bulb up the porcelain sockets—I like to use PH212 (150 watt bulbs) with a 4-bank covered wagon that is roughly 6 amps perfect for a 600-watt rotary dimmer. If you are using higher wattage bulbs like BBAs or BCAs, then secure two dimmers to the end of the batten strip similar to what you see in the image above. If you use compact fluorescent lamps (CFLs), then keep in mind that they cannot be dimmed. If you do attempt to dim CFLs, then you will either burn out the lamp’s ballast or
the dimmer.
Step Six:
Unroll the chicken wire and staple it to one side of the batten strip.
Step Seven:
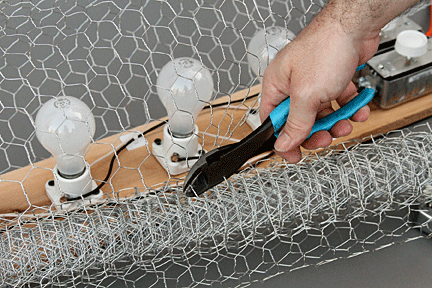
Unroll the chicken wire over the top of the bulbs to the other side. You want space (about 4 inches) between the top of the bulbs and the chicken wire, so the bulbs do not touch the diffusion material. “The higher you make this gap, the larger the diffusion face will be and the softer the fixture will be. When you’ve measured what you need, use your cutters to trim off the excess wire.” (Jay Holben) It’s good practice to trim off the pointy or edgy remnants of the chicken wire. Another good idea to avoid harmful pinches is to get some duct tape and tape the end of the chicken wire – almost like duct tape border.
Step Eight:
Staple the second side of the chicken wire; creating a structure that will support the diffusion material around the fixture.
Step Nine:
Measure out your diffusion and mount it on to the fixture using binder clips. My diffusion of choice is muslin (unbleached or natural) to give the unit a warm feel. Clothespins (C47’s) can also do it though sometimes they snap and fly off when wrapping the commando cloth around it. I don’t think it is wise to tape the diffusion to the back of the unit—it gets messy/sticky.
Step Ten:
Measure out some commando cloth and wrap the unit to give it some control. NOTE: You must leave room at the ends of the covered wagon for the heat to escape, otherwise the heat will build up and burn the muslin or the bulb will pop. Also, commando cloth is flame retardant.
Step Eleven:
Plug into variac or your lunchbox and turn on the light. The pigeon plate allows you to mount the light onto grip head or a c stand. The variac or the dimmer allows you to bring down the intensity.