If you’re having trouble making a confined area appear larger when filming in a small area, you’re not alone. Professional filmmakers also return to the drawing board when attempting to create space and illustrate depth and scale in a small area. And even with all the fancy CGI and other advanced technology at their disposal, filmmakers often rely on techniques that have been around for almost as long as Cinematography itself.
Filmmaking Tips for Shooting in a Small Area
Below are some ways to make your small space feel much grander and make the most out of a limited area — so that you’re not forced to cut any awesome ideas you had in mind. With enough practice, you’ll soon have an eye for making even a tiny room appear bigger.
Creating Deep Space
One of the oldest tricks in the book for creating the illusion of depth is called deep space, and it can be used to trick the audience’s brain into imagining that the space is deeper than it is. Why do we use the word “trick?”
Because any screen you are looking at, whether it’s a movie screen, a computer, or your handheld device, the image has height and width, but there is no depth. The audience’s eyes are always focused on the surface of the screen. Depth is an illusion created by photography. But in the look of “deep space,” we are doing everything possible to enhance this illusion.
Here are several things you can do to create deep space:
1. Use wide-angle lenses.
Wide-angle lenses expand space, while telephoto lenses compress space. By using the wide-angle lens, we can create the illusion that the space is much deeper than it is. The wider the lens, the deeper the space.
2. Use high number F. stops.
Using the higher number F. stops (f. 11, f. 22, f. 32) when exposing your image will dramatically increase your depth of field. Depth of field is a technical term used to describe how much of the image is in focus. We can have everything in the frame from three inches to infinity in focus, or we can shrink the depth of field so that someone’s eyes are in focus and the tip of their nose is out of focus.
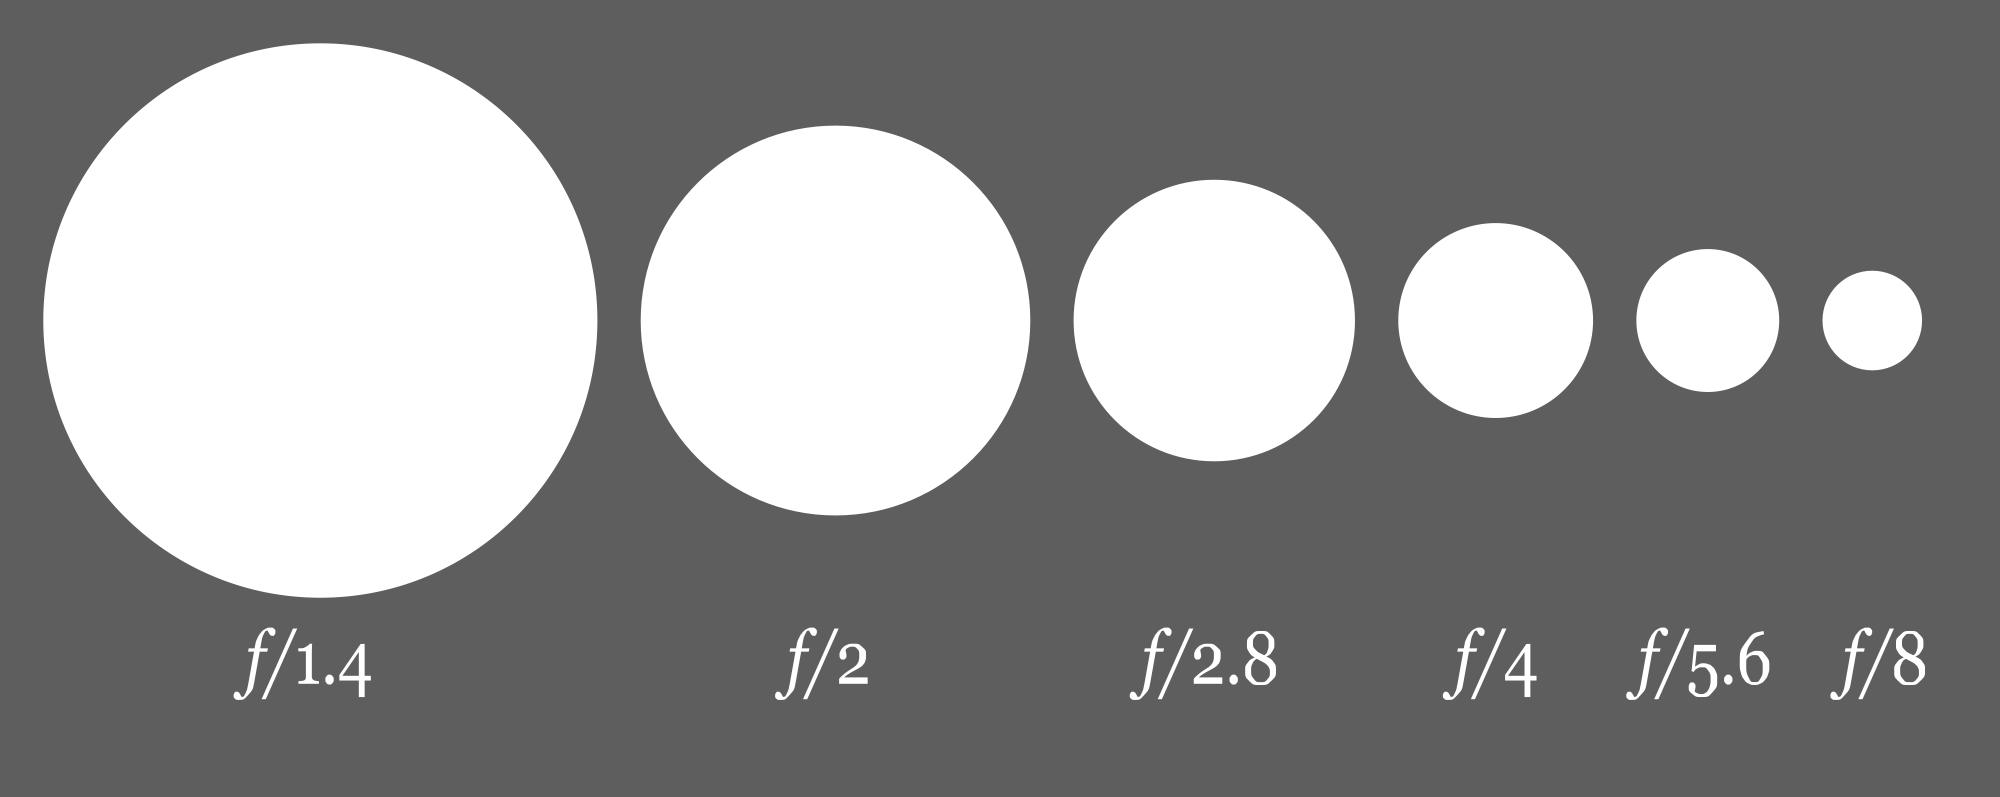
By using high f. stops, we can put the background into focus; the audience will be more likely to look at it. And when they do, their brains will be fooled into thinking that they are refocusing from the foreground to the background and back again, heightening the illusion of depth.
3. Stage your actors perpendicular to the flat picture plane.
By staging one of your actors in the foreground and another in the background, the audience will be fooled into imagining that they are looking into the distance of the shot.
4. Move your actors perpendicular to the flat picture plane.
Watching the actors move toward or away from the camera will reinforce the illusion of depth in your shot.
5. Move the camera perpendicular to the flat picture plane.
Moving the camera into or out of the shot, even slightly, is like taking the audience by the hand and leading them through the space, giving the depth more credibility.
6. Light with shadow.
Shadow is something our brains use to determine the depth of objects. Just imagine if I drew a circle on the page. It would appear flat. But as soon as I began to shade it, the circle would have the illusion of a third dimension. So, use light to create shadow on your actors and your set to reveal the contours and depth of your image.
7. Place bright objects in the foreground and keep the background dark.
Bright objects have the illusion of advancing, while dark objects have the illusion of receding. By placing actors in bright costumes against dark backgrounds, we can enhance the illusion of depth.
8. Place warm colors in the foreground and cool colors in the background.
Just like bright and dark objects, colors have a similar effect. Warm colors have the optical illusion of advancing, while cool colors have the illusion of receding. So, by placing actors in warm-colored costumes against cool-colored backgrounds, we can, once again, enhance the illusion of depth.
A Simple Trick For Dealing With Extremely Small Spaces
This all sounds good, doesn’t it? But what if you’re shooting in a really small space, say a bedroom in a typical student apartment? It’s probably the size of a closet! Perhaps the room is so small you can’t even get the camera inside. Some cameras are large. If you throw in the tripod, assuming you’re using one, you might find that you’ve taken up 2-3 feet just with the camera.
In addition, some lenses have a minimum focusing distance. In other words, even after squeezing the camera into the room, you can’t get far enough away from your subject to focus on it.
Well, here’s a handy guerilla shooting technique: shoot into a mirror. That’s right. Get a mirror, mount it on the wall, and back your camera away. By doing this, you can effectively double your distance from your actor. If the mirror is 3 feet from the actor and the camera is 3 feet from the mirror, you’re now 6 feet away from the actor.
This means you can use a longer lens and solve that tricky problem of minimum focus distances. Of course, your image will be flipped from left to right. But if that bothers you, you can flip it back again in the editing room. Naturally, the better the mirror, the less likely you’ll have ripple distortion in the reflected image.
Learn Cinematography Skills at NYFA
At NYFA, aspiring visual storytellers can explore a variety of Cinematography programs designed to develop essential skills in composition, lighting, and beyond.
Header image via Matheus Bertelli on Pexels.