
Throughout your photography classes (if any), you have likely heard that a blurry image is a ‘bad’ image, and you should try to keep your camera as still as possible when photographing. Luckily, most photographic rules are meant to be broken, and this one is no exception. Instead of merely stopping motion, why not embrace it? Why shouldn’t a moving subject appear to be moving? Once you get past the desire to stop all motion in its tracks, you’ll open up a whole new world of photography that you never knew existed. This technique isn’t only used in sports photography; there are plenty of different situations in which motion blur photography comes in handy.
The trick is knowing the difference between motion blur and camera shake. The former is a particular photographic technique, one that accentuates movement within a photograph. The latter, however, is something that happens when the photographer involuntarily moves the camera slightly while taking a photograph, and often ends up with less-than-desirable results.
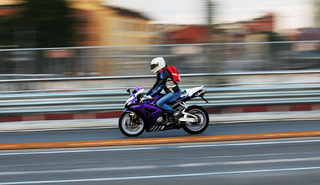
In the photograph above, you can tell that the motorcyclist is moving at a fast pace, due to how blurred the background is. But how on earth could the photographer effectively stop the motion of the motorcyclist, while still getting a beautifully blurred background? This trick is known as panning.
Panning
While the idea behind panning is simple, the execution takes a bit of practice. You’ll need to get acquainted with following your subject with your camera, and then continuing to “follow through” as the shutter is released. If you have the means of acquiring a tripod with a swivel head, this will make panning significantly easier. If not, it’s important to keep the camera as steady as possible when you’re photographing your subject.
- Choose a location that doesn’t have many foreground distractions. While the background of your image will be blurred, anything in the foreground will take away from your subject. Sometimes the background itself can be too distracting – too colorful, too many different shapes and textures, etc. If this is the case, find a simpler location to photograph. Panning will be easiest if you choose to set up your camera in a position that is parallel to the path your subject will be taking.
- Check your camera manual to see if your camera has an AI Servo function. This artificial intelligence allows your camera to “track” moving subjects and constantly re-focuses on them, to ensure that your final image will be crisp.
- If your camera doesn’t have this capability, you’ll have to pre-focus on a spot in the middle of your composition that your subject will likely pass through. Have someone stand in that spot, or place an object there to focus on. Once everything is in focus, switch your focus ring to manual to avoid camera re-focus mid-shot.
- Your shutter speed will be determined by the speed of your subject and how blurred you want the background to be. The slower your subject, the slower your shutter speed should be – and vice versa. A good place to start is between 1/30 and 1/125, and then adjust as necessary. Your ISO should be set to 100 or 200, and your aperture should be set between f/8 and f/16 to ensure that the subject remains in focus. If the day is particularly cloudy, you may need to open up your aperture more or bump up your ISO, each situation is different.
- When you’re ready to take the photograph, start moving the camera in the direction your subject is moving before you press the shutter, and continue to move it in the same direction after you press the shutter. This will ensure a sharp subject and a beautiful, consistent blurred background.
Zoom Blur
When using the technique of zoom blur, you don’t need to have a moving subject. Instead, you’ll use a zoom lens to create the illusion of movement. It’s important to note that these images can be incredibly distorting, especially when printed in larger sizes. While this can be good if that’s the effect you’re going for, it’s likely that you won’t want to use this technique for the majority of your photographs.
- In order to really achieve zoom blur, you’ll need to use a slow shutter speed, often around 1 second. Start with 1 second, and then increase or decrease the amount of time the shutter is open depending on your own personal preferences.
- If you’re photographing during the day, using a long shutter speed will often end up with overexposed images. In order to reduce the chances of this happening, you should shoot at a low ISO – around 100 – and shoot at an aperture of f/22. This will let the least amount of light into your camera, allowing for a longer shutter speed.
- When you’re ready to take your photographs, zoom in or out while pressing the shutter button. Because you’re zooming while the shutter is open, you’ll achieve the blurred look above.
Movement at Night
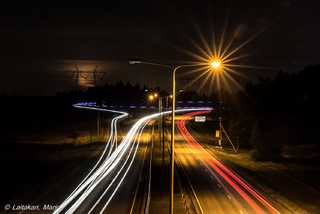
Using a long shutter speed to photograph motion at night can create especially compelling images, especially when you get creative with your subject matter. Whether you’re standing above a busy street (as seen in the photograph above) or right down in the middle of a big city, there’s always some motion of light to capture. You’ll need to use a long shutter speed at night as well (at least 30 seconds, upwards of 2 minutes) in order to capture the movement of cars, but the lack of daylight will ensure that you won’t have an overexposed image.
If you want to get even more creative at night, try shooting a portrait in front of a busy street! The combined use of a flash and long shutter speed will ‘freeze’ your subject the second the flash is fired, but will allow for a beautiful blurred background of lights.
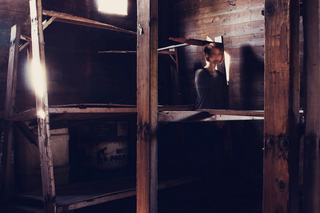
You can use a long shutter speed during the day to blur a moving head or other body part, such as in the image below, or you can use a flash and long exposure at night with flashlights and other lights to capture the movement of each light source throughout the frame of the photograph. Once you learn how to play with motion, you’ll be able to create stunningly beautiful images that have a sense of mystery, urgency, or are simply aesthetically pleasing. Have fun!
From new to experienced photographers, breaking the rules and using motion in photos can create truly captivating images. Utilizing panning, zoom blur, and long shutter speeds are just some of the photography techniques in our How To’s and our Photography School that help you build your photography skills.
